- Home
- Guides
- Control Panel
- Wonder System
Overview
A Wonder is a special kind of module. Unlike all the other modules on the ONEsite platform that have specific forms and functions, a Wonder can display anything in any way you choose. The difference is, with a Wonder, the network administrator must define both the physical structure of the module and the contents.
A Wonder has two parts:
- Structure – a Smarty template built using the Smarty Editor
- Contents – a form with fieldsets and fields built using the Wonder System interface (to be described further below)
The Smarty template is used to create the structure or backbone of the module. The structure is written using HTML. The fieldsets names and fields names are included in key locations within the HTML to provide the tie back to the network data. Once created, there is not usually a need to edit this template again.
The second part of the system is the creation of the data side of a Wonder. We’ll walk through the steps of creating the data now.
The combined framework of structure and content is what we would then refer to as a Wonder. Once a Wonder has been created, it is designed to support multiple instances or copies of itself, allowing a network to retain the desired look and feel and change the actual contents being pulled in.
A wonder by itself is like a paint by numbers picture. You’ve drawn the image ( Smarty template) and divided up the picture into numbered sections (fieldsets and fields). Creating an instance is like assigning that picture a legend. Is 3 red or is it blue?
For example, the module below is called Top Discussions. It highlights 1 story in the top half of the module, including a picture, title and description. The bottom half of the module displays links to other popular discussions. The module is capped off with a ‘more’ link going directly to the discussion system.
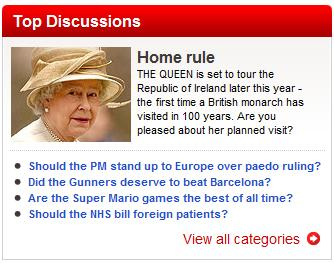
Because this was built using the Wonder System, the network can make as many instances of the Top Discussions wonder as they want and populate each one with a different set of discussions – one news themed, one sports themed, etc.
How to create a Wonder
Wonders can be managed at created from the main Control Panel at Site Builder > Wonder System.
To begin, click the ‘Create a new wonder’ button at the bottom of the page.
This opens a new box to allow you to define the details of the new wonder, including:
- Name of Wonder – the name of the wonder is only displayed here in the control panel.
- Template – The template is a Smarty template. Select an existing template or create a new one.

Once you have named your wonder and selected a template, it is time to add fields and fieldsets to your wonder.
Adding Fieldsets and Fields to a Wonder
A fieldset is a container for adding structure to forms. If your new wonder has multiple groupings of information, it might be a good idea to use fieldsets to organize them. You may, however, use only a single fieldset if you wish.
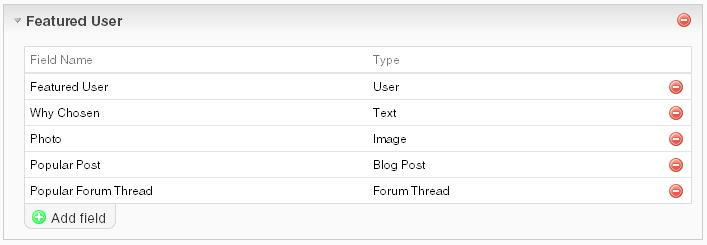
A field is a smaller piece of data that exists within your fieldset. In the example below, we will be looking at a wonder with a single fieldset that contains 5 fields.
It is important to note that both the fielset names used and field names used must match what is defined in the associated Smarty template.
Add a Fieldset
Click the ‘Add Fieldset’ link.

A fieldset has three pieces of information to be defined.
- Name – This is the name of the fieldset. It needs to match the name of the fieldset in your template. No special characters are allowed.
- Required – When working with an instance of this wonder, is this a piece of information that must be filled out every time or is it optional?
- Allow Multiple – When working with an instance of this wonder, will this information be listed once, or might you need to display multiple answers? If the answer is yes, you will be prompted to further define the minimum and maximum number of times the field can be completed.
Hit the ‘Save’ icon to save your fieldset. This will immediately open the add fields interface.
Adding Fields
Each field has two items to define:
- Name – This is the name of the field. It needs to match the name of the field in your template. No special characters are allowed.
- Type – Type determines what kind of value need to be filled in when working with an instance of this wonder.
Type represents the hook back into the data on your network. A list of available types includes:
- Text
- URL
- User
- Group
- Video
- Blog Post
- Forum Thread
- Image
- Article
- Poll
- Petition
- Survey
- Podcast
The first two options – Text and URL – are freeform response types. All other values here are types of data on your network.
In the example below, the first field has been set to be a user on the network.

After the first field was saved, the ‘Add Field’ button was clicked to add a new field. This field has been set to be a freeform text response.

Skipping ahead, we now have a completed list of fields defined for this fieldset. This wonder will allow a network to highlight a user and their actions within the network.
Instances
Once a Wonder has been fully defined you can now make instances of it. Click the arrow to the left of the Wonder name to show a list of existing instances or to create a new one.

Click ‘Create a new instance.’

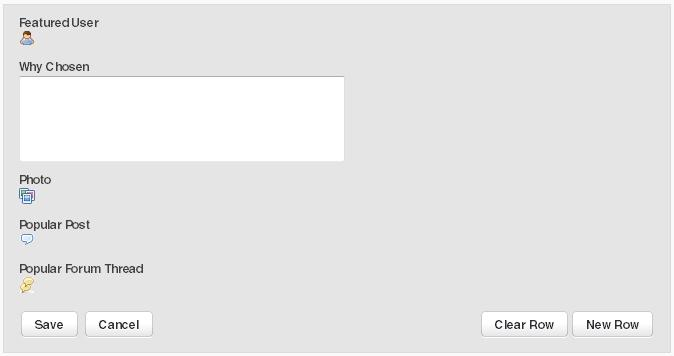
In the image below we see our new wonder with the fields we had previously defined. Click the pencil icon to edit your instance.

Each field in your wonder has been set to contain a certain type of data. Four of our fields are connected to data on your network, while the final is a text area. Clicking on the icon next to any of these four fields will open the Search Box keyed to that content type.
Field Types and Searches
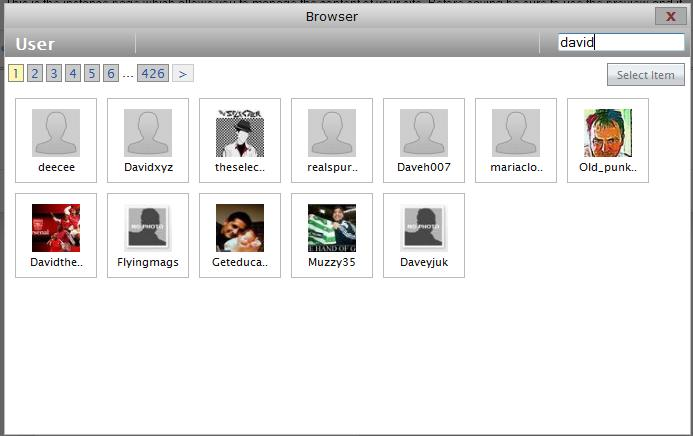
In the image below, we have selected to search for a user to populate the first field in our instance. The search box will display all available data for the content type selected. It also includes keyword searching in the upper right.
Completed Instance and Previewing
Once you have used the search box to select the content for the four data fields, your instance will display each of your selections. Your options now are to Save, Cancel, Clear or start a New Row.
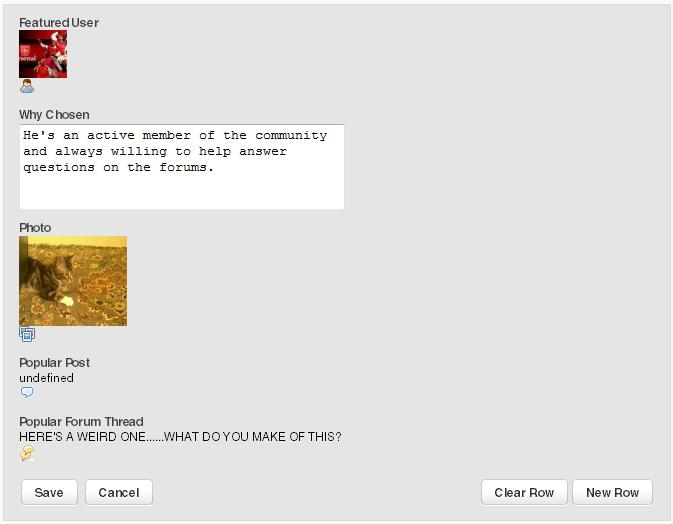
Hit Save. You will be taken back to the initial view of your instance except now, all the fields will be filled in.

Once your instance has been saved, you have the ability to preview what it looks like. If you’re editing an existing instance you will be able to see the module on the page where it is currently loaded. Otherwise, the system will give you the option of previewing it on any page of your network. The default preview location will always be your homepage.
