- Home
- Guides
- Control Panel
- Manage Sitemap
Overview
The ONEsite sitemap feature is a system designed to make the generation of sitemaps for important links on your social network a simple endeavor. This page will guide you through the steps needed to make several working sitemaps quickly and efficiently.
The Manage Sitemap feature can be accessed through the Control Panel at Sitebuilder > Settings > Manage Sitemap.
Types Of Generatable Sitemaps
There are three types of sitemaps which can be generated on your social network:
- General XML sitemap
- News XML sitemap
- User Navigation HTML sitemap
General XML Sitemap
This is a general XML sitemap which is generated based upon the sitemap 0.9 specification which can be found at www.sitemaps.org. These URLs are generated in section 1 of the Control Panel tool, to be described later in the document. It should be noted that once the sitemaps are altered, the changes will not be visible in the XML file until it is next generated, within 24 hours of the change.
Sample Entries
<?xml version="1.0" encoding="UTF-8"?>
<urlset xmlns="http://www.sitemaps.org/schemas/sitemap/0.9">
<url>
<loc>http://mysite.com/go/forum/main</loc>
<priority>.8</priority>
<changefreq>always</changefreq>
</url>
<url>
<loc>http://mysite.com/go/network/blogs</loc>
<priority>.8</priority>
<changefreq>always</changefreq>
</url>
</urlset>
News XML Sitemap
The News XML sitemap is a special subset of the sitemap, and is used to keep track of blog posts on your network. This sitemap is automatically generated every day at the same time, and includes all of the publically viewable blog posts on your network (up to 1000, the maximum number of entries as per the newsmap specification).
Sample Entries
<urlset xmlns="http://www.sitemaps.org/schemas/sitemap/0.9"
xmlns:news="http://www.google.com/schemas/sitemap-news/0.9">
<url>
<loc>http://mysite.com/jon_stewart/blog/2008/11/03/dancing_poodles</loc>
<priority>.8</priority>
<changefreq>always</changefreq>
<news:news>
<news:publication_date>2008-11-03T02:00:09-06:00</news:publication_date>
<news:keywords> Poodles, Dog</news:keywords>
</news:news>
</url>
<url>
<loc>http://mysite.com/stephen_colbert/blog/2008/11/02/superhappytime</loc>
<priority>.8</priority>
<changefreq>always</changefreq>
<news:news>
<news:publication_date>2008-11-02T22:31:56-06:00</news:publication_date>
<news:keywords>Barack Obama, Fine Wine</news:keywords>
</news:news>
</url>
</urlset>
HTML Sitemap
This sitemap is forward facing on your network, and is mainly used for navigation and highlighting of important links on your network. It is mainly controlled by the second section of the Control Panel tool, but can make use of all of the links in the General XML sitemap. Please note that any links which appear in the HTML sitemap must also appear in the General XML sitemap.
Manage Sitemaps
On your first visit to the Manage Sitemap page you will need to activate the feature by clicking the Enable Sitemap link.
Once activated, you will be presented with the main sitemap interface.


This interface is divided into two parts:
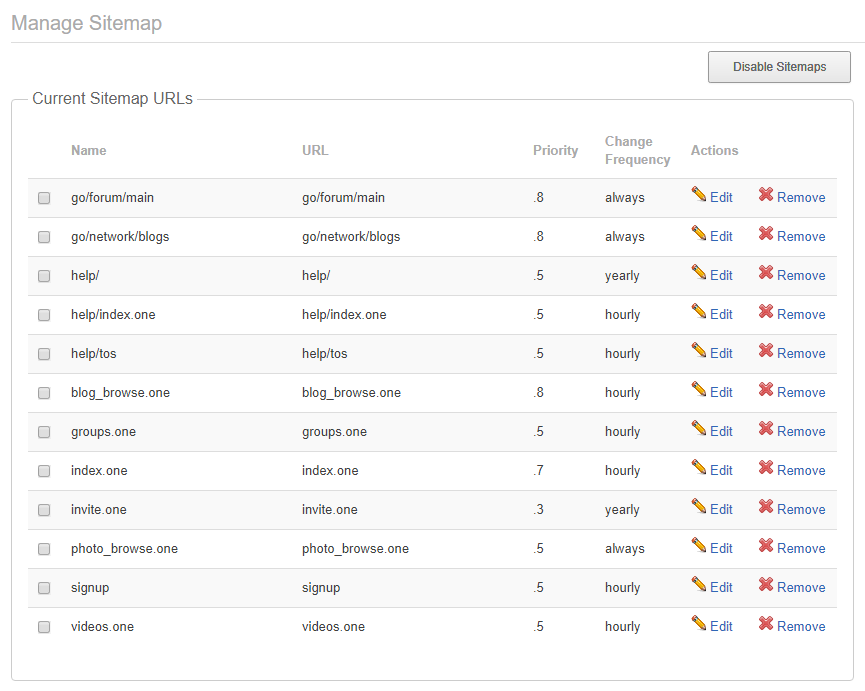
- Current Sitemap URLs
- Sitemap Sections
Current Sitemap URLs
This section handles which URLs will appear in your General XML sitemap, and which URLs can appear in your HTML sitemap. You can:
- Add a new URL
- Edit an exisiting URL
- Remove URLs

Adding a new URL
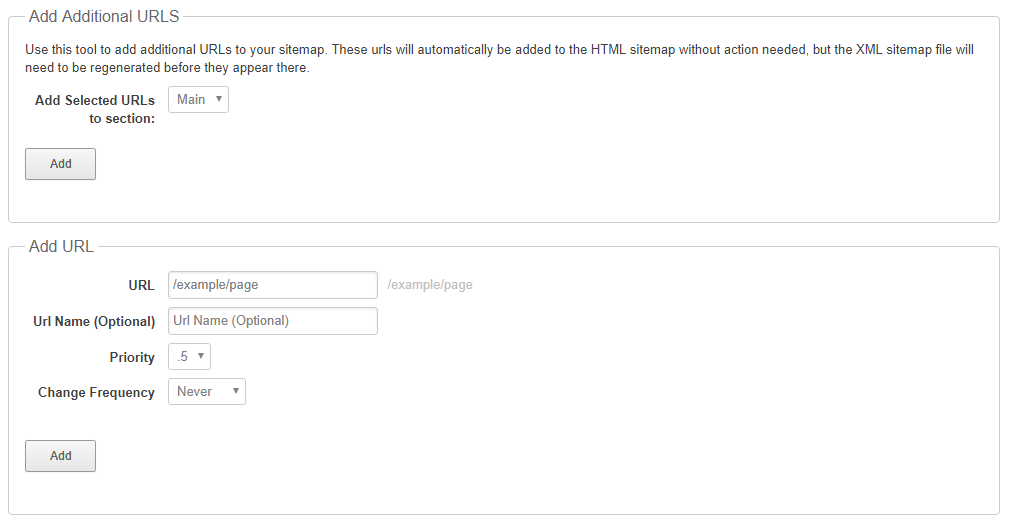
- URL – URL refers to the actual relative location of the link you’d like in the sitemap. If your URL is http://community.domainname.com/go/network/history you would enter go/network/history in this box.
- URL Name (optional) – This is a friendly name for your link when you are placing it in an HTML sitemap.
- Priority – This is a dropdown containing values from .1 to 1. It refers to how high of a priority the link has compared to other items inside your sitemap.
- Change Frequency – This dropdown tells spiders how often you expect the content of that URL to change. It does not force spiders to crawl your URL at that frequency, however, but gives them an idea of how often you think this page will be refreshing. Choices include:
- Never
- Always
- Hourly
- Daily
- Weekly
- Monthly
- Yearly
Add URLs to Section
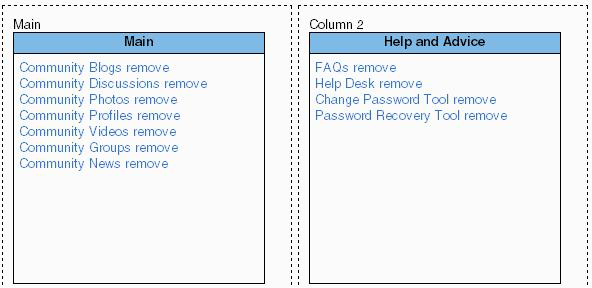
After URLs have been added to the listing above you can categorize them in your HTML sitemap with the Add URLs to Section dropdown. Select the checkboxes for the URLs you wish to add to a section, select the section, then hit Add. These will now display under the appropriate section heading below.
In the example below there are two sections – Main and Help and Advice.

Sitemap Sections
The Sitemap Sections tool control your HTML sitemap which will be found at community.domainname.com/go/network/sitemap. It has 4 key sections:
- Add Section or Column – This allows you to add new sections or columns to your page. Adding a column will literally add a new column to your sitemap. A section is a sub heading within a column. By default, a sitemap will begin with one column and one section entitled Main.
- Move Section – This option allows you to move any section in your sitemap between columns.
- Remove Section – This will delete an entire section within your sitemap. This cannot be undone.
- Remove Column – This will delete an entire column within your sitemap. This cannot be undone.

