- Home
- Guides
- Control Panel
- Toolbar Admin
Overview
The Toolbar Admin feature can be accessed from the main Control Panel at Site Builder > Look & Feel > Toolbar Editor.
The Toolbar Admin feature is divided into two parts:
- Quick Setup (initial page load)
- Hotspots (page two)
Quick Setup
- Logo – This is your site logo. Upload an image or choose an image from your gallery
- Background – This is the background of your toolbar area. Use an image or color, or leave transparent.
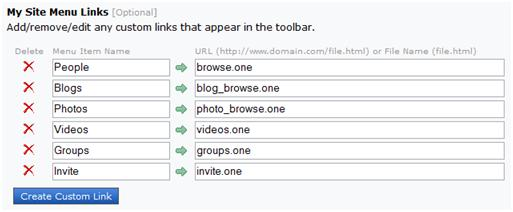
- Menu Links – The menu is the main navigation system for your site. Use the default choices or select your own custom link information.
The logo and background images are set using photo manager.
By default, the navigation menu has 6 links – People, Blogs, Photos, Videos, Groups, and Invite. Through the My Site Menu Links area of the toolbar admin, you can:
- Rename any link
- Reorder the links
- Remove a link
- Create custom links – on or off your network

At any time, you can reset your menu back to the default settings. Changes to the menu are reflected immediately upon saving.
Hotspots
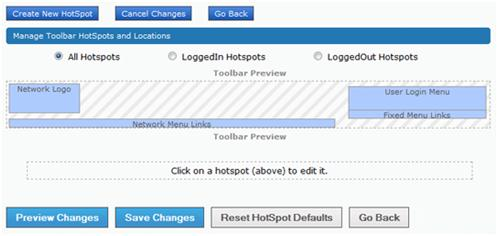
The second part of the toolbar manager is the Hotspot editor. Hotspots are specific areas in your toolbar like your logo and menu. Through the Hotspot editor you can position and style each part of your toolbar individually.
In the Toolbar Preview, you can see the name and position of each Hotspot from three views:
| View | Description |
|---|---|
| All Hotspots | View all hotspots |
| Logged In Hotspots | View hotspots visible only when logged in |
| Logged Out Hotspots | View hotspots visible only when logged out |

Editing Hotspots
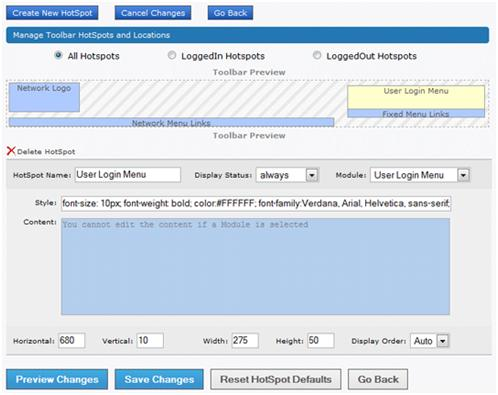
To edit a Hotspot, click on it in the Preview area. This opens the editor. Each Hotspot has:
| Field | Description |
|---|---|
| Name | The name of your Hotspot. |
| Display status | Set when visible – always, logged in, or logged out. |
| Module | Hotspots are able to pull in premade toolbar modules like user menu, custom menu links, and the fixed menu links. Using a module is not required. If using a module, however, you cannot edit the content of that Hotspot. |
| Style | Each Hotspot can have unique styling applied to it. Style information should be added here in a CSS format. I.E. “font-size: 10px; font-weight: bold; color:#FFFFFF;” |
| Content | To give your hotspot custom content or function, html, JavaScript or other information can be added to the content area. |
| Position | Horizontal and Vertical. Edit the positioning and hit preview to view your changes. Remember your toolbar can only be 960px wide. The height of your toolbar is determined by the position of the bottom edge of the lowest Hotspot in your toolbar – usually the Network Menu Links. |
| Size | Height and Width. |
| Display Order | By default, the display order is automatically generated. If you have two or more Hotspots existing in the same space, you can set the primary Hotspot to have a higher display priority. The lower the number, the higher display priority the Hotspot will have.If two hotspots share the same physical space, the hotspot with the lowest display number will appear in front of the 2nd hotspot that has the higher number. |

